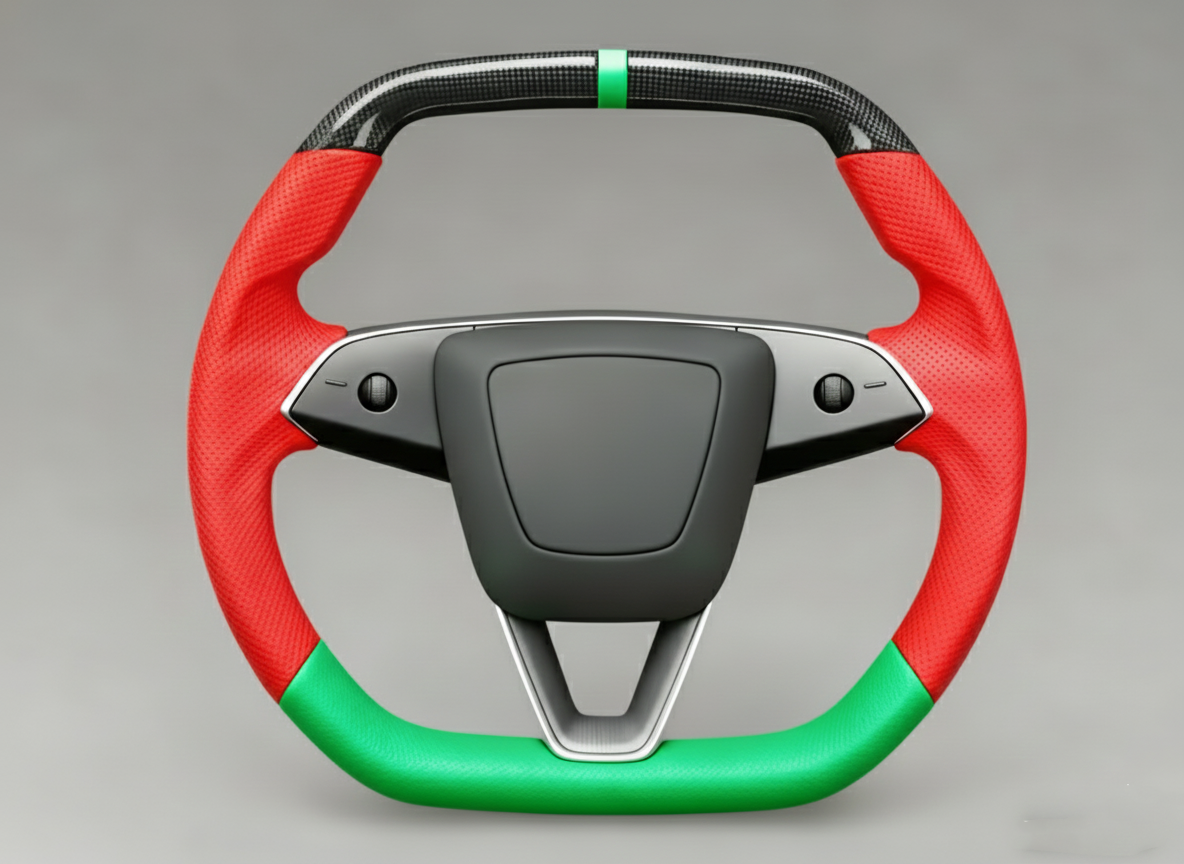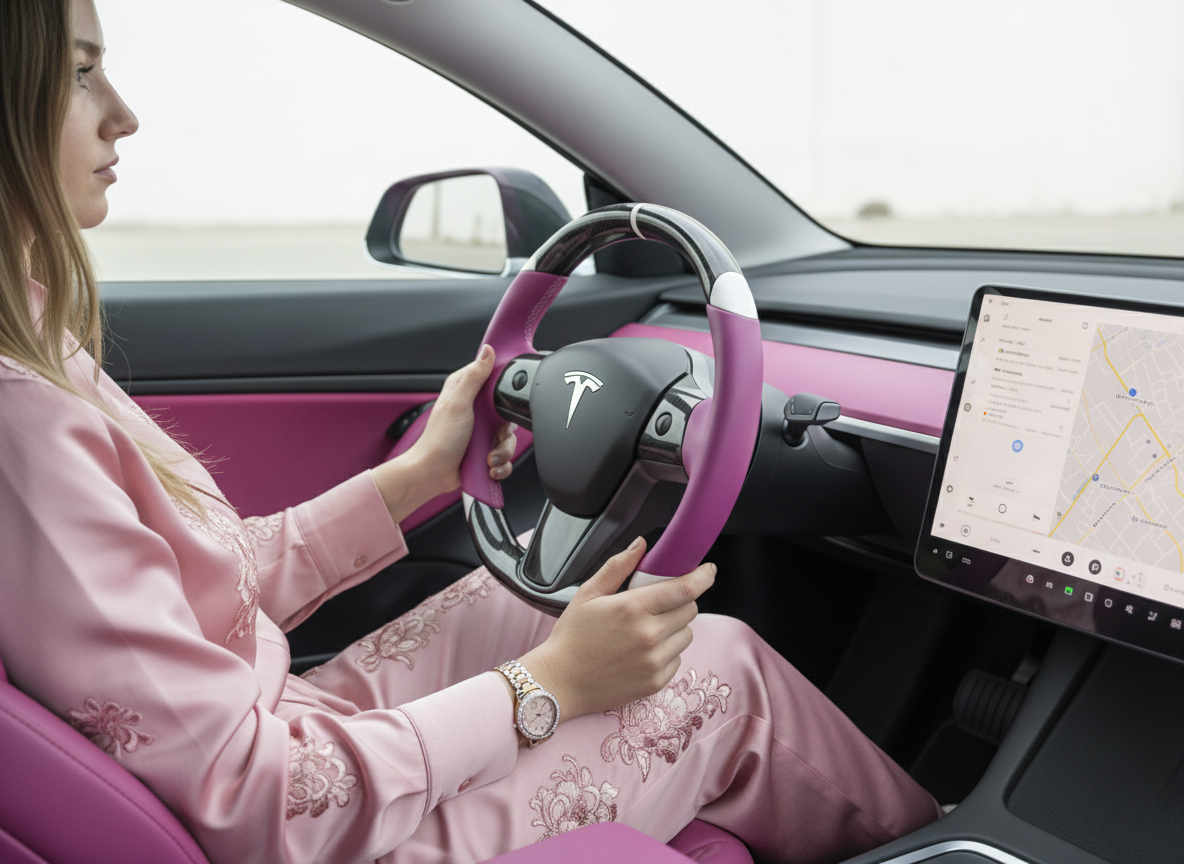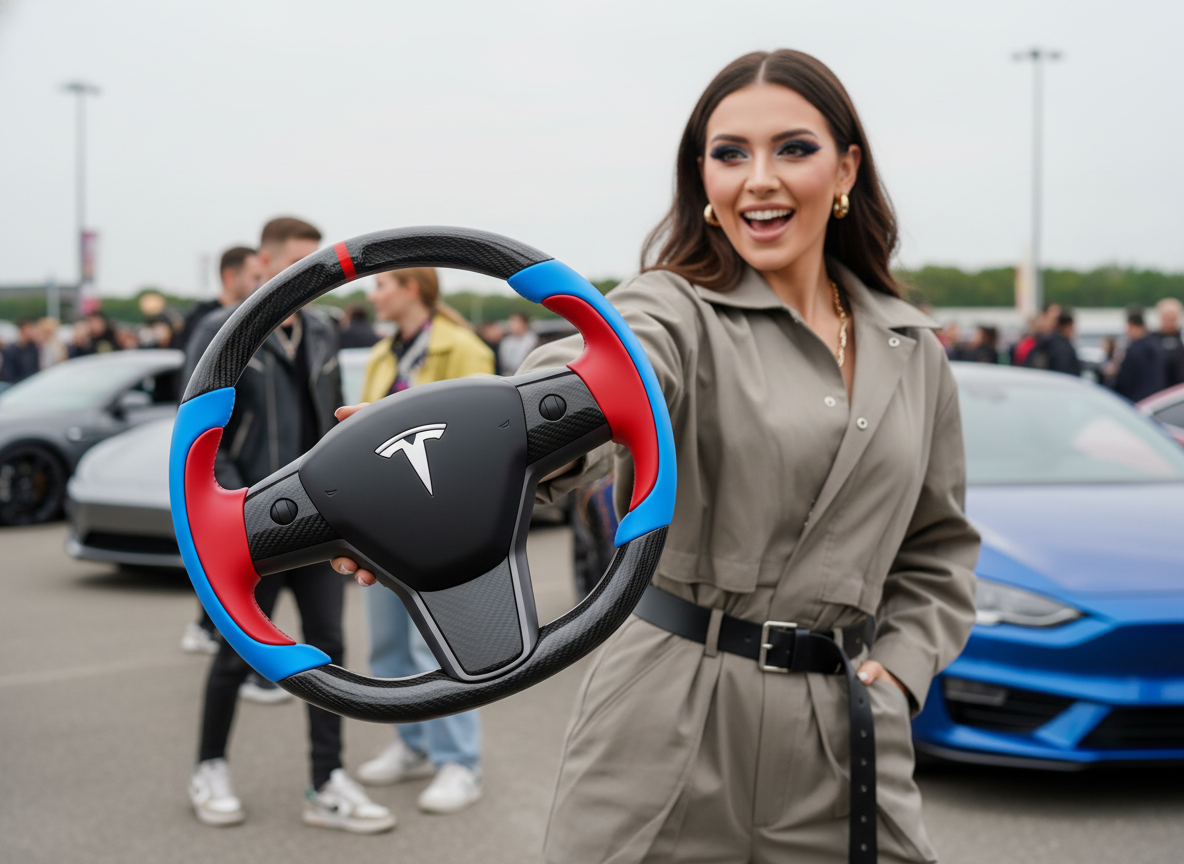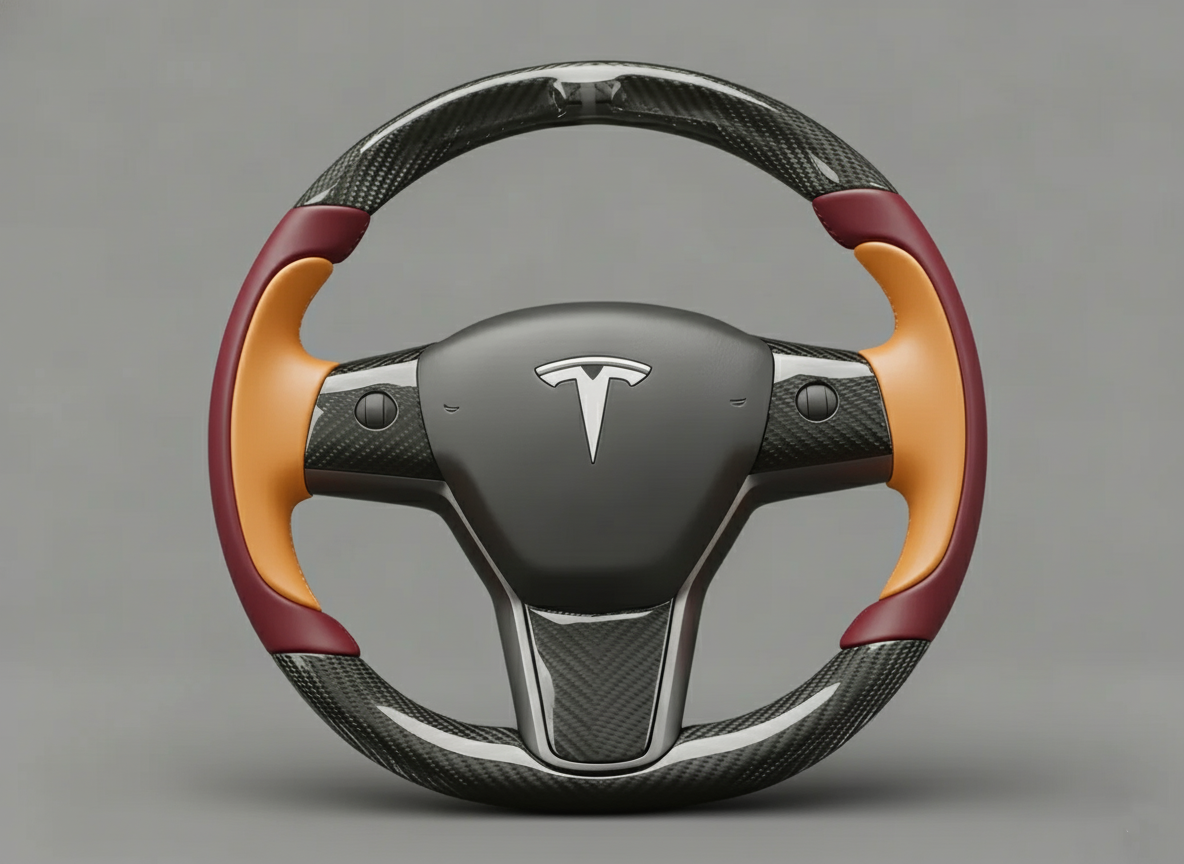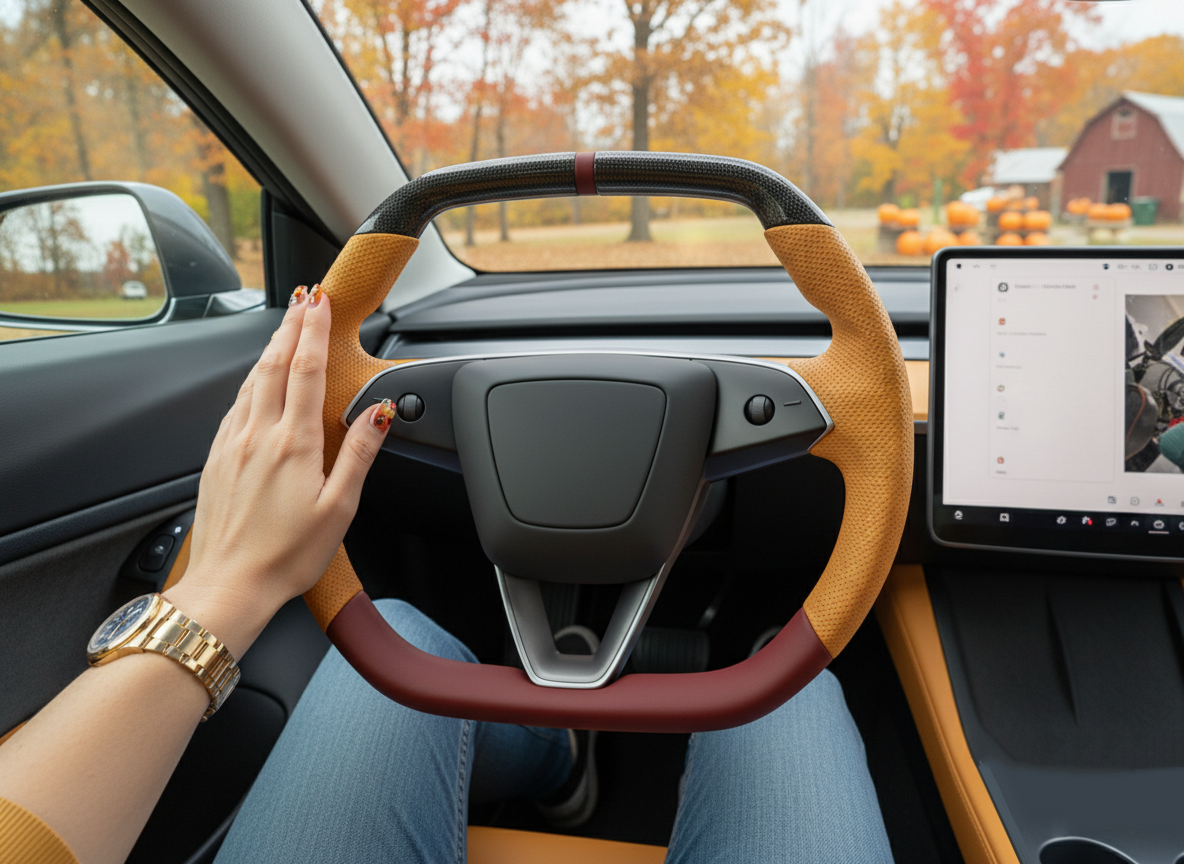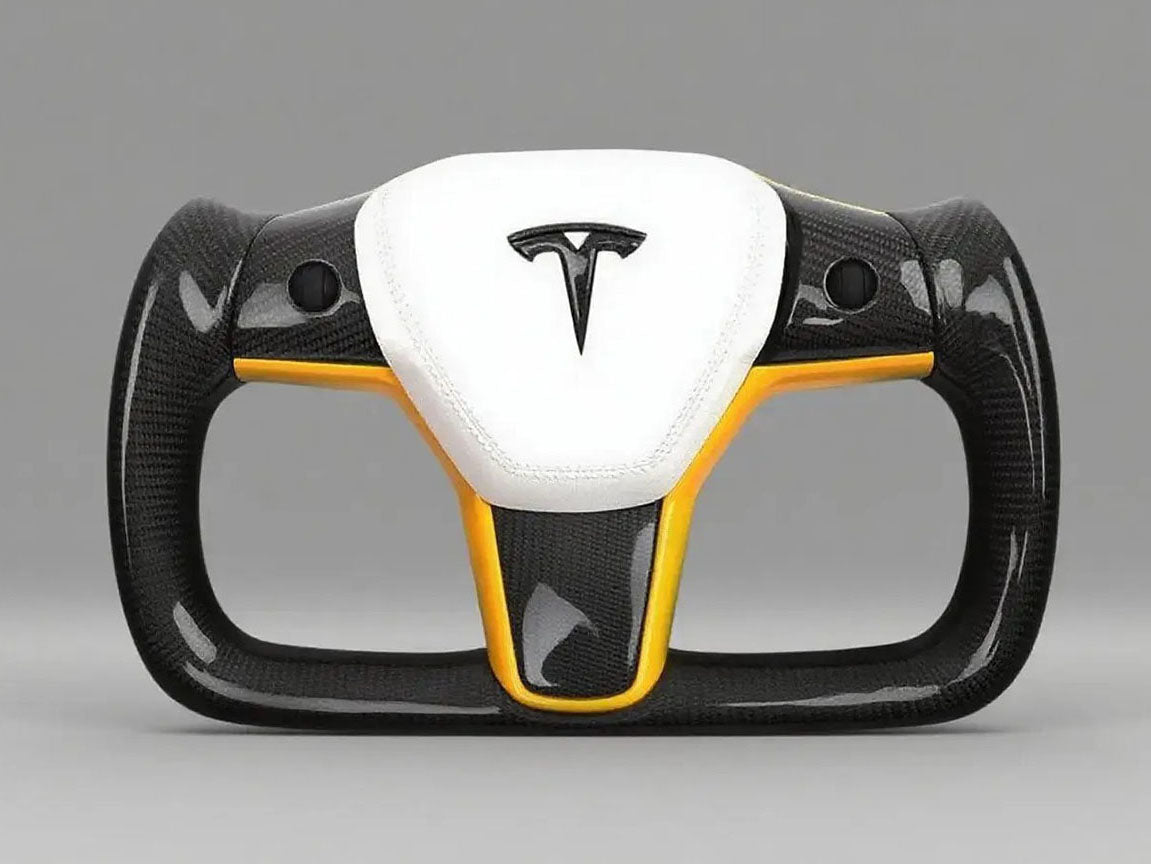
Add an embroidered Red Centering Mark at the 12 o'clock position to assist with orientation. Select 3K Twill Dry Carbon Fiber trim overlays to non-destructively cover the factory silver area.
Suggest integrating an OBD-connected LED Shift Light system to display RPM in real-time, creating a track-level cockpit atmosphere.
Embroidery
The most common configuration is matching the stitch color to the factory White or Beige seats, or adding a "Plaid" graphic on the airbag cover. Stitching methods are mainly divided into Euro Stitch and Cross Stitch.
Unlike simple steering wheel covers, professional embroidery requires stripping the original leather and re-wrapping.
This modification usually adds $50 to $150 to the total price of the steering wheel. As long as the process avoids the heating element, it will not affect the factory steering wheel heating function.
Thread Material
Why Not Nylon?
Nylon performs well in initial strength, but it has a fatal flaw for automotive interiors: Hygroscopy (Moisture Absorption).
- UV Degradation: Under long-term sun exposure (especially UV rays amplified through the windshield), the molecular structure of nylon breaks down. Data shows that Nylon 6 tensile strength drops by 40% to 50% after 12 months of continuous exposure.
-
Physical Properties Comparison: Modification shops should only use Polyester.
- Polyester has 3 times higher UV resistance than Nylon.
- Polyester is hydrophobic; it does not absorb moisture and acidic substances from hand sweat like Nylon does, preventing the thread from molding or becoming brittle.
About the "Bonded" Process
You must request the use of Bonded thread.
This is a special resin coating wrapped around the multi-strand fibers.
- Preventing Unraveling: This coating prevents the multi-strands from separating (Ply separation) when the sewing needle pierces the leather at high speeds.
- Abrasion Resistance Data: Bonded threads typically meet ISO 2062 standards. For a Yoke, which is subject to extremely frequent hand contact, unbonded soft threads will start to fuzz or pill after 20,000-30,000 miles.
Choosing Thread Thickness
US and European industrial standards typically use the Tex system to mark thickness; the larger the number, the thicker the thread.
| Spec (Tex Size) | Commercial Label (Ticket No.) | Recommended Use | Visual & Functional Description |
|---|---|---|---|
| Tex 70 | Tkt 40 | Factory Restoration | This is the spec closest to the Tesla OEM factory setting. If you want an "invisible mod" effect, choose this. Its breaking strength is approx. 10 lbs (4.5kg). |
| Tex 90 | Tkt 30 | Mainstream Recommendation | Selected for 80% of Yoke mods. Slightly thicker than factory, offering better visibility, with strength increased to 13-15 lbs. Moderate 3D effect, comfortable to touch. |
| Tex 135 | Tkt 20 | Racing Style | Very thick thread, common in Porsche or Ferrari custom interiors. Strong visual impact, rugged like a shoelace. |
Look for These German and British Brands
To ensure colorfastness and durability, ask the modifier if they use the following brands:
-
Amann Serafil (Germany):
The benchmark for global high-end automotive interiors. Its Continuous Filament technology makes the thread surface as smooth as silk. If a modifier uses Amann Serafil, it usually implies they are not cost-sensitive and care more about quality. Their Color 1000 (Raw White) and Color 8000 (Black) are industry standard colors. -
Coats Gral (UK):
Another top-tier choice, mainly popular in the US market. Its lubrication coating is excellent, reducing friction heat during sewing and preventing scorching at the leather needle holes.
Specific Color Recommendations
Tesla's Ultra White interior makes stitching look dirty very easily.
- Anti-Stain Coating: High-spec sewing threads come with WR (Water Repellent) treatment from the factory. For white stitching, this is mandatory. Without WR, oils from hands penetrate the thread core, turning white thread yellow-brown after three months, which is impossible to clean.
- Color Fastness: Require thread that meets Grade 7 or 8 under standard ISO 105-B02 (Max is Grade 8). This means fading is invisible to the naked eye after 500 hours of simulated Florida-intensity sunlight. Many low-end Red Threads turn pink after six months because their color fastness is only Grade 4-5.
Special Thread for Airbag Areas
If the steering wheel center Airbag Cover is to be wrapped and stitched, you must not use the high-strength Bonded Polyester threads mentioned above.
- Breaking Strength Limit: Airbag stitching must use specialized Break-away Thread.
- Specs: The breaking strength of this thread is strictly controlled within a specific range (usually under 5 lbs) to ensure the thread snaps instantly when the airbag deploys, without hindering inflation.
- Construction Requirement: Ask the shop if they own a "Bobbin Tension Meter" to calibrate the sewing machine. The tension tolerance for airbag thread is extremely low; too tight causes the cover to crack itself, too loose looks ugly.
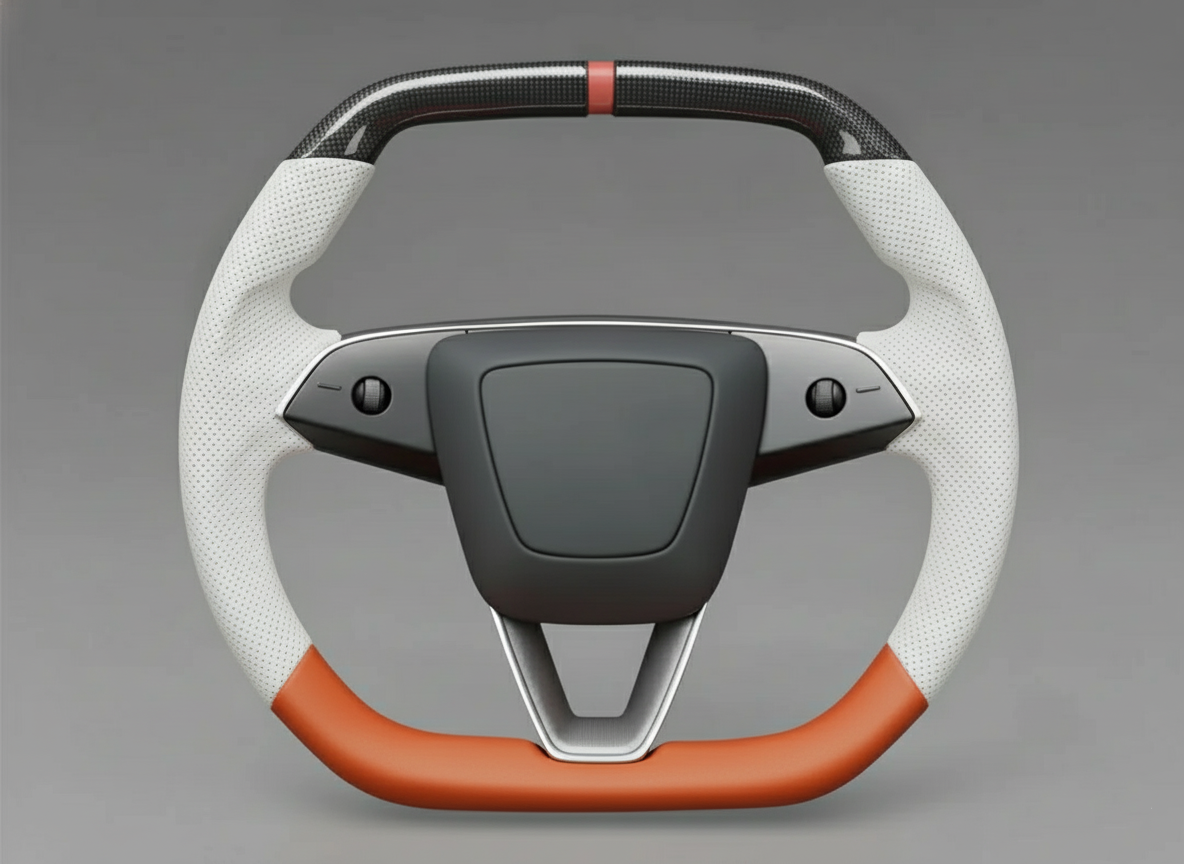
Stitching Styles
Euro Stitch
This is the safest choice with the highest tolerance for error, and is the factory standard for Tesla, BMW M-Power, and Audi RS series.
-
Visual Characteristics:
You will see rows of neat, parallel diagonal lines connecting the two pieces of leather. It looks very regular and understated. Some shops call it "German Stitch." -
Tactile Feedback:
This is the smoothest of all stitches. Because there are no complex knot stacks, you can barely feel any protrusion when sliding fingers inside the wheel. If your daily commute exceeds 1 hour, or you habitually spin the wheel with one hand while reversing, choose this—it won't chafe. -
Craftsmanship Detail:
Standard Euro stitch requires a Stitch Length control between 4mm and 5mm. If too dense (<3mm), leather edges tear easily; if too sparse (>6mm), the leather at corners will pucker. -
Use Case:
For maintaining OEM texture or pairing with smooth Nappa leather.
Cross Stitch
Common in JDM tuners and early American muscle cars, many Yoke owners now choose this for a "combat" feel.
-
Visual Characteristics:
Threads cross to form continuous "X" shapes. Visually, this stitch is about 20% wider than Euro stitch, showing more thread. -
Tactile Feedback:
You can clearly feel the intersection points of the thread. This slight roughness provides extra physical friction. If your hands sweat easily or you dislike wearing racing gloves, Cross Stitch helps you grip more steadily. -
Potential Issues:
Due to overlapping threads, the stitch area sits 0.5mm to 1mm higher than the surrounding leather. For people with sensitive palms, long-term gripping might feel abrasive. -
Cleaning Difficulty:
The "X" structure traps dirt more easily than parallel lines, especially mixtures of hand oils and dust stuck in the intersections. If choosing this, it is best to pair with dark thread (black or gray); choosing white thread is asking for trouble.
Baseball Stitch
An extremely American, rugged style, and the most complex to craft.
-
Visual Characteristics:
Looks exactly like the stitching on a baseball. It consists of a series of complex "V" braids, looking very substantial. -
Tactile Feedback:
This is the hardest and most prominent stitch. Its thickness is significant, noticeably increasing the inner circumference of the steering wheel. If you have small hands or feel the factory Yoke is too thin and want a "fuller" feel, Baseball Stitch can artificially thicken the wheel. -
Leather Treatment Difference:
For Baseball Stitch, leather edges are usually not folded but joined with raw edges exposed. This demands extremely high precision in cutting the leather. -
Price Factor:
This stitch consumes 3 times the thread length of Euro stitch and takes 2 times the labor. Customization fees usually add an extra $50 to $80.
Stitch Density
Besides style, you must watch the density of the holes. This parameter is SPI (Stitches Per Inch).
-
Too High SPI:
Many novice shops punch holes very densely (e.g., 4-5 stitches per cm) to look refined. This is devastating to real leather. Like perforations on a stamp, overly dense holes create a tear line when the leather stretches, causing it to split along the seam. -
Too Low SPI:
If holes are spaced too far apart, the leather will bulge at high-curvature areas (like the 3 and 9 o'clock grips on a Yoke) and fail to hug the wheel body tightly. -
Golden Standard:
The optimal stitch length for a Yoke is 4mm to 5mm. Measure with a ruler: if there are about 20 to 24 stitches within 10cm, it is standard.
Hidden vs. Exposed Seams
This is a craftsmanship choice regarding how two pieces of leather join, determining the "stage" for the stitching.
-
Japanese Connection:
Both leather edges are folded inward, butting tightly against each other with almost no gap. This is the premium method. Here, the stitching pulls the two pieces together with even force. -
German Connection:
A gap of about 1mm to 2mm is left between the leather pieces. This allows the stitching to sit inside the channel, reducing wear. If you choose thick thread (Tex 135), this method makes the surface flatter. -
Mock Stitch:
Beware of this. Some low-end mods glue the leather completely to the wheel and sew a few stitches purely for decoration, where the thread serves no structural purpose. Test it by flicking the thread with your finger; real stitching pulls the leather edge, mock stitching is loose while the leather stays rigid.
Finishing Knots
You surely don't want the thread to loosen and the wheel to unravel like a sweater after two years.
-
Double Needle Lock Stitch:
Professional steering wheel sewing must use double needles. With every stitch, the two threads interlock inside the leather. -
Independence Test:
The advantage is that even if the thread breaks at one point, the adjacent stitches will not unravel.
Airbag Cover Embroidery
Safety Bottom Line
When consulting a shop about airbag covers, the first question must be: "How do you handle the tear line?"

The factory plastic airbag cover has a pre-manufactured groove on the back, designed in an "H" or "U" shape, allowing the cover to split instantly upon deployment.
When you apply a layer of 1.2mm Nappa leather or Alcantara over it, if not treated properly, this becomes a tough "blast blanket."
-
Laser Weakening Process:
Qualified modifiers use a CNC Laser Cutter to engrave the back of the leather. The laser cuts away 40% to 50% of the thickness, creating an "invisible tear line" that cannot be seen from the front but is structurally fragile. -
Alignment Accuracy:
This weakened line on the back of the leather must overlap 100% with the plastic base's original fracture line. If misaligned by more than 2mm, airbag deployment resistance increases. -
Consequence:
If leather is applied without weakening, airbag deployment time may be delayed by 0.05s to 0.1s. In a high-speed collision, this delay determines whether the airbag catches your head or deploys into your face after impact.
Special Craftsmanship for Embroidery Patterns
Embroidery on an airbag cover (like the Plaid logo or Tesla Logo) is totally different from embroidering clothes. Embroidery adds local thickness and changes leather tension.
-
Realizing the Plaid Pattern:
The Plaid badge on the rear of Model S/X has a gradient effect. To replicate this on leather, high-level factories use 3 different shades of gray thread plus black thread.- Low Density Stitching: Stitch Density on the airbag cover is usually 15% lower than on the grips. Too many stitches turn that patch of leather into hard cardboard, affecting deployment.
- Avoiding the Tear Zone: Smart designs cleverly avoid the central H-shaped tear line. If you see a merchant's embroidery pattern crossing the exact center of the cover (where it splits), buy with caution; the thread there must be extremely fragile special cotton thread.
-
Logo Debossing vs. Embroidery:
If you worry about thread affecting safety, choose "Debossing." This uses a high-frequency heat press to stamp a mold onto the leather, creating a 3D indented texture.
Dedicated Thread Specs
If you buy an airbag cover with Decorative Stitching around the edges, check the thread used.
The high-strength Amann Serafil polyester thread (10-15 lbs tension) mentioned earlier must absolutely not be used here.
- Material Difference: Airbag areas must use Mercerized Cotton or specially treated Low Tex Polyester.
- Breaking Threshold: The breaking strength of this thread is typically set between 2.5 lbs to 4 lbs. Its function is solely visual; it must snap with the slightest force.
- Test Method: Upon receiving the product, pick at a thread end with your fingernail and pull slightly. If it's qualified airbag thread, you should feel it snap or stretch easily; if it feels as strong as fishing line, it is a non-compliant product.
Material Matching
Because the airbag cover is in the center of your vision, color mismatch with the surrounding interior is very obvious.
| Material Option | Color Code Reference | Buying Advice |
|---|---|---|
| Alcantara | 9040 (Deep Black) | This is the closest black to Tesla's factory black interior. Many cheap products use 9002 (Standard Black), which looks grayish under the sun and has a distinct color difference from the OEM black interior. |
| Alcantara | Dark Grey | Corresponds to Tesla's dashboard trim color. Some owners prefer the airbag cover to match the dash rather than the steering wheel. |
| Vegan Leather | Ultra White | White is the hardest to do. Tesla's white is cool-toned. Many third-party leathers are yellowish (Creamy). Suggest asking for Ultrafabrics brand samples for comparison; they are the closest supplier to OEM texture. |
| Vegan Leather | Cream | For Beige interior owners. This color varies greatly by batch; best to mail a small sample of OEM headrest leather to the merchant for color matching, or buy from major factories promising "OEM Match." |
Replacement Assembly vs. Existing Wrap
At the consumer level, you have two acquisition methods:
-
Option A: Buy a Replacement Cover
- Process: You receive a new plastic cover already wrapped with leather and embroidery. You need to remove the original airbag module and transfer it into this new cover.
- Pros: No vehicle downtime, can revert to factory state anytime.
- Cons: Expensive (usually $250 - $400), involves disassembling the airbag module, requires some hands-on ability.
-
Option B: Send-in Service
- Process: You remove your airbag and mail it to the factory; they wrap it and mail it back.
- Pros: Perfect fit for your airbag base, slightly cheaper.
- Cons: Car is undrivable for 1-2 weeks. How do you drive without a steering wheel? Unless you have a spare airbag.
- Warning: Shipping explosives (airbag modules) is classified as Hazmat (Hazardous Materials) shipping in most countries (including FedEx/UPS in the US), involving extremely troublesome and expensive procedures. Strongly recommend Option A, shipping only the plastic cover, not the explosive module.
The Danger of Metal Badges
Some merchants offer stick-on metal "T" logos or "Plaid" badges.
This looks cool, but there is a consensus in the modification community: No hard objects on the steering wheel airbag.
The moment the airbag deploys, this stuck-on metal badge becomes Shrapnel.
Although many merchants claim the adhesive is strong, no glue is reliable against such massive impact force.
If you insist on a Logo, please stick to embroidery or heat-pressed debossing. Do not joke with your eyes.
Trim Strips
This material has its thickness strictly controlled between 0.3mm to 0.5mm, with a single piece weight usually under 20g, achieving a zero-gap fit with factory injection-molded parts without increasing the steering wheel's rotational inertia.
Compared to wet carbon which yellows easily or cheap hydro-dipped ABS, dry carbon trim strips use Toray T300/T700 precursor filaments, offering heat resistance up to 120°C, remaining stable under long-term high-temperature exposure under the windshield.
Most solutions use 3M VHB Industrial Grade Adhesive for non-destructive overlay, with installation taking only 10-15 minutes.
Material Craftsmanship
What's So Good About Dry Carbon?
The raw material for this process is "Pre-preg," meaning carbon fiber cloth that has been impregnated with epoxy resin at a 35% to 40% ratio at the factory and stored in a freezer.
During manufacturing, the factory places the pre-preg into a mold and sends it into an Autoclave. Two hard data points determine its quality:
- Pressure Environment: The entire curing process occurs under high pressure of 6 Bar (approx. 87 PSI). Massive pressure squeezes out all microscopic air bubbles between fibers.
- Temperature Control: Continuous heating above 120 degrees Celsius.
The result of this high-temperature, high-pressure process is that a standard Yoke V-shaped trim strip's thickness can be stably controlled at 0.3mm to 0.5mm.
This is crucial because the scroll wheels and turn signal buttons on the Model S/X are fixed.
If the trim thickness exceeds 0.8mm, the buttons will feel "sunken," and fingers will scrape against the trim edge during operation, resulting in a very harsh feel.
The Thickness Flaw of Wet Carbon
Most products around $100 on the market are Wet Carbon.
Workers lay dry carbon cloth on a mold, apply resin manually with a brush, and then vacuum cure it.
The biggest problem with this process is the inability to precisely control resin content. The resin-to-carbon ratio often reaches 50:50 or higher.
Excess resin cannot be fully expelled, resulting in a finished thickness usually between 1.0mm to 1.5mm.
When you stick this wet carbon trim on a Yoke, you will see a distinct layer of transparent jelly-like substance (Clear Coat) from the side, which not only thickens the grip but also shows wavy patterns due to resin shrinkage.
Furthermore, lacking high-temperature curing, wet carbon is more prone to Resin Yellowing under summer exposure at 60°C inside the car, especially at the edges.
The Visual Trap of ABS Hydro-dip
This is the lowest-end process: printing a carbon fiber pattern onto an ABS plastic base via water transfer. Identifying it is simple:
- Check Pattern Depth: Real carbon fiber shows a 3D effect (Chatoyancy) where fiber bundles alternate light and dark as the angle changes. Hydro-dip is flat printed ink; the pattern is dead and lacks depth no matter how you turn it.
- Check the Back: Real carbon fiber trim shows the texture of the carbon cloth on the back. ABS trim usually has a smooth black or white plastic back.
Weave Pattern Data Standards
To match the factory interior of the Tesla Model S/X Plaid, you must focus on the carbon cloth weave parameters.
- 3K Tow: Each weave unit (Tow) consists of 3000 filaments. This is the most universal spec for automotive interiors. Some cheap products use 6K or 12K large checkerboard patterns, looking very rough and mismatched with the refined factory style.
- 2x2 Twill Weave: This is the Tesla OEM standard pattern. It's a "two over, two under" weave, visually forming diagonal textures. If you buy Plain Weave (1x1), it looks like a checkerboard and will appear very abrupt when installed.
- Pattern Direction: A detail often overlooked. High-quality Yoke trim strips should have Symmetrical V-Weave on the left and right sides, converging towards the center of the steering wheel.
Gloss vs. Clear Coat
The outermost Clear Coat isn't just for shine; it's the line of defense.
- Gloss: Good gloss finishes are sprayed at least 3 layers and polished. You need to check if High Solids Polyurethane clear coat with UV Inhibitors is used.
- Matte: Matte isn't unpainted; it's clear coat with flattening agents added. Matte trim demands higher craftsmanship because gloss can be polished to remove dust specs, while dust falling into matte finish during spraying cannot be fixed and the part must be scrapped.
Edge Cutting Precision
Because the button area on the Yoke is very compact, trim cutting tolerance must be controlled within 0.2mm.
Advanced factories now use 5-axis CNC Robot Arms for cutting instead of hand sanding. CNC cutting ensures perfect roundness of scroll wheel holes and vertical edges.
If the trim is hand-sanded, you will often find slight wavy undulations in straight sections or uneven chamfers, flaws clearly visible from the driver's perspective.
Fitment Gap and Adhesive
ly, the installation medium. Dry carbon trim is extremely rigid; even slight mold errors cause lifting.
- Adhesive Thickness: Industrial standard mods use 3M VHB 5952 series tape or thinner 3M 200MP carrier-free adhesive film. If adhesive thickness exceeds 0.8mm, it causes the trim to float, revealing a gray glue layer from the side, which looks very ugly.
- Adhesion Promoter: Before installation, 3M 94 Primer or similar promoter must be applied to the corners of the original trim.
Comparison of Installation Methods
Overlay: Just Stick It On?
It looks barrier-free but actually requires a very "steady hand."
-
Tape Specs and Thickness:
Legitimate manufacturers pre-apply 3M VHB series double-sided tape on the back, usually model 4229P or 5952. This tape thickness is about 0.8mm. Added to the trim thickness (Dry Carbon ~0.5mm, Wet Carbon ~1mm), the steering wheel surface will protrude 1.3mm to 2mm overall after installation. -
Adhesion Promoter is Essential:
The package usually includes a wet wipe that smells like alcohol but stronger; this is Adhesion Promoter, generally 3M 94 Primer.- Correct Usage: Clean the original wheel with 70% Isopropyl Alcohol to degrease. Once dry, apply the promoter to the original trim surface, wait 30-60 seconds for it to dry slightly, then stick the new trim on. If you skip this, the trim edges will definitely lift when interior temperatures hit 60°C (140°F) in summer.
-
Irreversible Alignment:
VHB tape is pressure-sensitive; once contacted and pressed, adhesion activates instantly. You have only one chance. If misaligned by 1mm, trying to peel it off and re-stick will likely crack the thin dry carbon fiber plate or ruin the adhesive.
Replacement: Requires Airbag Safety Steps
While it offers the best results, it involves touching chassis circuits and the airbag module.
-
Must Cut 12V Power:
On Model S/X Plaid, simply hitting "Power Off" on the screen is not enough. for absolute safety and to prevent triggering an SRS Fault Code (which requires software to clear) when removing the airbag, you need to disconnect the 12V Lithium battery negative terminal in the frunk and disconnect the firefighter's loop (Penthouse loop) under the rear seat. -
"Blind" Airbag Removal Trick:
The Yoke airbag removal holes are very hidden. You need to rotate the wheel 90 degrees to expose the side holes.- Tool: Best to use a T25 screwdriver or a thin flat-head punch.
- Feel: This step relies entirely on feel. Insert the tool about 5cm to blindly find the internal Spring Clip.
-
Watch Wire Colors:
The back of the airbag usually has yellow and purple connectors with locking tabs. You must lift the locking tab before unplugging. Violent pulling will damage the pins on the harness end, causing the horn to fail or the airbag light to stay on after reassembly.
Scroll Wheels and Touch Buttons: High Failure Zones
Regardless of installation method, the two scroll wheels and surrounding Haptic Buttons on the Yoke are the main areas to check for quality.
-
Overlay's "Deep Well" Effect:
Because overlay adds thickness, the original scroll wheels will appear sunken.- Operational Feel: When scrolling with your thumb, the pad of your finger will hit the edge of the trim first.
- Sticking Risk: If the adhesive is applied too thickly and oozes out when heated, it may stick to the side of the scroll wheel, preventing it from rebounding or clicking.
-
Replacement's Button Transplant:
The touch button modules on the factory trim are clipped into the back. When changing to a new trim, you need to remove and transplant these electronic modules.- Tolerance Requirements: Tolerance here allows only within 0.1mm. If the new trim's slots are crooked, the buttons will be loose after installation, causing buzzing rattles while driving.
Which is Harder to Revert Later?
Many owners remove mods when selling the car or when the Lease expires. You need to calculate the restoration cost.
-
Overlay's Residue Nightmare:
3M VHB tape, after two years of thermal cycling, usually leaves a thick layer of black spongy residue when peeled off.- Cleaning Cost: You need lots of Goo Gone or similar adhesive remover and a plastic scraper to slowly scrape it off.
-
Replacement's "Non-destructive" Reversion:
If you kept the removed factory trim and screws, restoration is just the reverse operation.- Risk Point: The only risk is that factory plastic clips might become brittle and break during restoration.
Calculating Labor and Risk Costs
| Cost Type | Overlay | Replacement |
|---|---|---|
| Standard Shop Hours | 0.2 - 0.5 Hours | 1.0 - 1.5 Hours |
| Avg Labor Cost (North America) | $30 - $75 (Many shops install free with purchase) | $150 - $250 |
| Hidden Risk Cost | Misaligning wastes a piece of 3M tape | Breaking Clock Spring or clips |
| Technical Threshold | Low (Requires carefulness) | Medium-High (Requires circuit/mechanical knowledge) |
For most users without car repair experience, if choosing Replacement, it is strongly recommended to pay the $150+ labor fee.
Because if you break the internal Clock Spring while removing the airbag, the repair cost can exceed $600, plus you'll need to book Tesla Service and wait for parts.
Pattern and Gloss Selection
3K Twill is the Factory Standard
Tesla factory uses 3K Carbon Fiber, meaning each fiber tow contains 3000 filaments.
You will see several specs on the market; distinguish them carefully:
-
2x2 Twill Weave:
This is the only correct choice if you want to perfectly match the Plaid factory center console carbon trim.- Visual Features: The weave is "two over, two under," creating obvious diagonal textures visually.
- Lighting Effect: Twill has strong depth; when turning the wheel in sunlight, you see light and shadow flowing across the fibers (Chatoyancy effect).
- Adaptability: Because 2x2 weave is looser than plain weave, it conforms better to the complex curves of Yoke handles without distorting or breaking fibers at corners.
-
Plain Weave (1x1):
If you see square checkers like a chessboard, that's Plain Weave.- Avoid This: This pattern is usually for structural parts, not decorative ones. It looks visually flat with no depth. It appears very abrupt on a Yoke because no other part of the car uses this pattern.
- Process Defect: Plain weave cloth is too stiff to wrap Yoke edges without cutting fibers, so plain weave trims often have extremely ugly black paint masking at the edges.
-
Large Checkers (6K/12K):
This wide checker pattern is common in some supercar mod kits, but in Tesla's minimalist cabin, giant black squares break visual balance and look too rugged.
Must Be Symmetrical V-Weave
This is the most intuitive detail distinguishing $100 trims from $300 trims.
The Yoke steering wheel is perfectly axis-symmetrical. Ordinary carbon cloth is unidirectional diagonal (e.g., all textures slant top-right).
If a manufacturer cuts both left and right trims from one sheet to save material, installed results show: left handle texture goes up, right handle texture also goes up.
High-End Process Standard (V-Weave):
Good trims must use "Book Matched" craftsmanship.
- The factory must precisely cut the carbon cloth at a 45-degree angle.
- Splice two pieces of carbon cloth with opposite grain directions at the mold centerline.
- The final effect is all carbon textures converging like arrows from both sides towards the center Logo.
Forged Carbon's Unique Aesthetic
Besides woven carbon, there is Forged Carbon. It's not woven but made by mixing chopped carbon fibers with resin and pressing them in a mold at high heat.
- Texture Features: The surface looks like irregular marble or camouflage. Every forged carbon trim has a randomly generated pattern with a unique ID.
- Target Audience: If your car has a wrap or Lamborghini-style body kit, forged carbon offers a strong aggressive vibe.
Pros and Cons of Gloss Finish
Gloss is the most common surface treatment.
- Process Thickness: Premium gloss trims are sprayed with 3 to 5 layers of clear coat, reaching a total thickness of 100 to 150 microns. This creates a "Wet Look," making the carbon fiber look like it's sealed in crystal.
- Daily Maintenance: Gloss is a Fingerprint Magnet. Yoke operation frequency is high; gloss surfaces quickly get covered in oils. Also, long-term wiping with paper towels or rough cloths leaves Swirl Marks, requiring periodic polishing.
- Glare Risk: This is a safety hazard. Under direct noon sunlight, high-gloss trims reflect strong light into the driver's eyes. If you drive in sunny areas (e.g., California, Texas), gloss trims might cause momentary visual interference.
Technical Advantages of Matte Finish
Matte or Satin is increasingly favored by high-end players, fitting Tesla's current design language better (Model 3/Y even removed piano black).
- Light Control: Matte clear coat contains silica flattening agents, controlling surface reflectivity to under 10%.
- Tactile Difference: Matte surface friction coefficient is slightly higher than gloss, offering a dry, fine damping feel. For drivers with sweaty hands, matte trims won't slip, feeling more solid.
- Stain Resistance: While matte also gets fingerprints, diffuse reflection makes them barely visible.
- Fatal Weakness: Matte trims are Irreparable.
Lifespan of UV Resistant Coating
Whether gloss or matte, ensure the product description includes UV Stabilizers.
Without anti-UV clear coat protection, carbon fiber trim exposed outdoors for 300 to 500 hours undergoes photo-oxidation of the resin.
- Yellowing: The surface starts turning yellow; originally black/grey carbon turns an ugly brownish-yellow.
- Hazing: The clear coat becomes opaque, like fog, blurring the carbon texture.
- Delamination: In severe cases, the clear coat becomes brittle and peels off.
LED Lights
The system reads CAN bus (Controller Area Network) data directly by inserting a wireless OBDII Smart Module under the driver's dashboard, synchronizing motor RPM, real-time speed (MPH/KMH), battery voltage, and water temperature with millisecond-level latency.
Most modules preset a dynamic prompt range of 2000 to 9000 RPM, where light groups light up sequentially from the sides to the center based on motor power output.
This component is usually encapsulated under a 3K Dry Carbon Fiber cover, powered via the 12V/16V power supply reserved inside the steering wheel, enabling functional expansion without damaging the original Clockspring, effectively supplementing the lack of a front instrument cluster display in Model 3/Y.
Connection Methods
How to Power the Steering Wheel
The factory design uses a "Clockspring" to transmit current, but its circuits are already full with airbags, horns, and scroll wheel buttons.
Current industrial solutions "borrow power" from existing lines inside the steering wheel.
-
Borrowing Heater Line (Most Common):
Most LED Yoke wheels require the vehicle to have factory steering wheel heating. The modification shop provides a harness that is a "Y-Splitter." It connects in series with the original heating module interface, tapping into the 12V or 16V power to supply the LED motherboard.- Pros: Strong current load capacity, stable power supply.
- Note: Some low-end modules may cause screen flickering due to voltage fluctuations when heating is turned on. Quality PCBs design stabilizing capacitors to filter this.
-
Borrowing Button Module Line:
For Standard Range Model 3/Y without heating, power logic is complex. Installation requires tapping positive/negative from the multi-function scroll wheel harness.- Limit: Button lines carry very low current (usually <1A), limiting the maximum brightness of LED beads.
12V or 16V?
Tesla quietly upgraded hardware in early 2022, changing the low-voltage battery from a traditional 12V Lead-Acid to a 15.5V - 16V Li-ion Battery.
If your car is a 2022+ model (usually with AMD Ryzen chip) and you buy an old-design LED wheel (only supports 12V input), consequences are: either the LED module burns instantly, or screens develop black spots from overheating after prolonged use.
| Vehicle Year | LV System Voltage | Purchase Requirement | Risk Warning |
|---|---|---|---|
| 2021 & Prior | ~12V - 14V | Standard 12V Module | Good compatibility, no over-voltage risk |
| 2022 & Later | ~15.5V - 16V | Wide Voltage Module (9V-18V) | Must confirm voltage compatibility, otherwise it will burn |
How is Data Transmitted?
Speed, RPM, and turn signals are in the car's computer; how do they cross the rotating clockspring to the wheel screen?
Almost all mature mod solutions abandon physical wiring for Wireless RF Technology.
-
OBDII Transmitter:
You receive a matchbox-sized black module to plug into the OBDII port in the driver's footwell. It does two things:- Reads specific ID data packets on the CAN-bus (e.g., PID 0x100 for speed).
- Packages and transmits data via 2.4GHz or Bluetooth BLE protocols.
-
Steering Wheel Receiver:
The LED motherboard on top of the wheel integrates a wireless receiver chip. When it receives signals from the OBD module, it parses and displays values on the screen while controlling LED lights. -
Latency Issue:
Don't worry about lag. Mainstream solutions have data refresh rates over 10Hz (10 times/sec), with latency controlled between 20ms to 50ms.
Sleep Logic and Power Drain
Many owners worry electronic add-ons increase power consumption, worsening Tesla's famous "Sentry Mode" drain or killing the small battery.
Qualified LED modules must have an Auto-Sleep mechanism:
- Wake: When the OBD module detects CAN bus activity (car wakes, door opens, or brake pressed), it sends a wireless signal to wake the steering wheel screen.
- Sleep: When the car locks and CAN bus is silent for over 30s to 60s, the screen and LEDs cut power and enter standby.
Data Reference:
- Operating Current: Screen on, approx. 150mA - 300mA.
- Sleep Current (Dark Current): Must be under 1mA.
If the screen stays dimly lit after locking the car, or you lose over 1% - 2% battery overnight, the sleep logic has failed, or the OBD module is keeping the vehicle awake in the background.
Physical Installation Details
"Non-destructive installation" doesn't mean no hands-on skill required.
- Airbag Removal: Requires poking spring clips on both sides of the wheel with a thin tool. You must completely disconnect the vehicle's low voltage loop (in the frunk) and wait 10-15 minutes for capacitors to discharge to prevent accidental airbag deployment.
- Transplanting OEM Parts: LED Yokes are usually sold as bare frames with electronic modules. You need to remove the Airbag Unit, Scroll Wheel Assembly, and Plastic Backplate from the original wheel and transplant them to the new one.
Customization Settings
Navigating Menu Logic:
Although the small screen resolution is decent, it doesn't support touch. All settings are done via Tesla's original Scroll Wheels.
Since this system "parasitizes" original button signals, entering the menu usually requires a specific "code."
- Enter Engineering Mode: Common operation is Long Press Left + Right Scroll Wheels for 3 seconds, or Long Press Right Scroll + Brake Pedal. The screen switches from dashboard mode to a text-only Setup Menu.
- Navigation & Confirm: In the menu, scrolling the Right Wheel moves the cursor up/down, pressing the wheel is "Confirm/Enter," and pushing left is usually "Back."
Adjusting "RPM" Mapping Range:
As mentioned, Tesla has no RPM; the LED bar shows Power Output Percentage.
Factory defaults are usually aggressive; lights might hit 50% with just 10% throttle.
In stop-and-go city traffic, a flashing disco ball on the wheel is distracting.
You need to reset the Mapping Range based on daily driving:
-
LED Start RPM:
Recommended: 3000 - 3500.
If set to 0 or 1000, lights turn on as soon as the car moves. Raising it to 3000+ keeps lights off during low-power city creeping, maintaining cabin visual peace. -
LED End RPM (Redline):
Recommended: 7000 - 8500.
This determines when lights "strobe." For Model 3 Performance or Model S Plaid owners, set high to 8500, ensuring lights only converge to red during true Full Throttle sprints.
Defining Your Color Temperature:
High-end modules allow Block-by-Block Color adjustment. Usually, the top light strip consists of 8-10 independent LEDs on each side.
You can find "Color Definition" in the menu; precision is usually preset-based, though enthusiast firmware supports RGB 0-255 input.
-
JDM Style Setup:
- 0% - 40% Range: Set to Green. Represents economic cruising.
- 40% - 80% Range: Set to Yellow. Represents entering power band.
- 80% - 100% Range: Set to Red + Flash Rate set to Fast. Represents peak power.
-
Tesla OEM Style Setup:
Set all ranges uniformly to White or Ice Blue, flashing Red only at redline threshold. This matches Model 3/Y's minimalist cool-tone interior better without looking like a tuner car.
| Parameter Option | Recommended (Daily) | Recommended (Track/Aggressive) | Visual Description |
|---|---|---|---|
| LED Mode | Single Bar | Center Out | Single Bar flows left to right; Center Out is F1 style converging from sides to center. |
| Max Brightness | 40% - 50% | 100% | 100% brightness causes reflection on windshield at night; keep it low. |
| Speed Limit | Off / 85 MPH | Off | Sets a speed alert; whole strip breathes red when speed exceeds 85 MPH. |
Digging Hidden Data:
The layout of the central 0.96-inch+ LCD screen is customizable.
The default home page usually just shows huge Speed numbers, but as an owner, you should use it to monitor data unseen on the central screen.
In "Layout" or "Display Data" submenus, you can replace display items:
-
Coolant/Motor Temp:
Tesla's center screen doesn't show specific temps. For track players, this is the only place to see battery thermal status real-time. Set unit to Celsius (°C); normal range is 30°C - 50°C. If it spikes over 90°C, ease off the throttle even if no error pops up. -
12V/16V Battery Voltage:
Strongly recommend setting secondary data to Voltage.- Monitoring Logic: Tesla small batteries often fail without warning. If voltage reads consistently below 12.5V (Old models) or 14.8V (Li-ion models), it's a sign of DC-DC converter abnormality or impending battery death.
-
0-60 MPH Timer (Performance Timer):
Turn on "Acceleration Test" mode. Screen displays "Ready".- Trigger Logic: System monitors G-Sensor or speed signal. Timing starts automatically upon sudden speed change from 0; stops and locks result when reaching 60 MPH or 100 KMH.
System Level Tweaks
ly, check generic system settings affecting stability.
- Speed Unit: Confirm KMH or MPH. Some modules default to MPH, which is confusing for metric users.
-
Shut Down Time: Recommend 30s or 60s.
- Too short (e.g., 5s): If braking hard at a red light entering Hold mode, CAN bus pauses, and screen might mistakenly shut down.
- Too long (e.g., 5min): Screen stays on after you leave, wasting component life.
-
Protocol Selection:
Advanced option. If data lags or is scrambled, check here. Usually offers "Model 3/Y CAN" and "Model S/X CAN"; ensure correct model selection, or the decoder might misinterpret window signals as RPM.